Last Updated on 2026-05-12 by Daev Roehr
(Incept date: 2023.05.13)


Series I (top), Series IV (middle) and Series VI (bottom)
Bose 901 speakers are better conceptualized as a “loudspeaker system”, one that incorporates:
1) The speaker boxes themselves and placement of the speaker boxes relative to the rooms walls.
2) A robust power amp to drive the speakers properly.
3) The required Bose Active Equalizer.
If you neglect setting up any part of this system up properly, you will achieve mediocre to poor results.
1) The speaker boxes and their physical placement in the room is easily understood, if not always easily achievable.
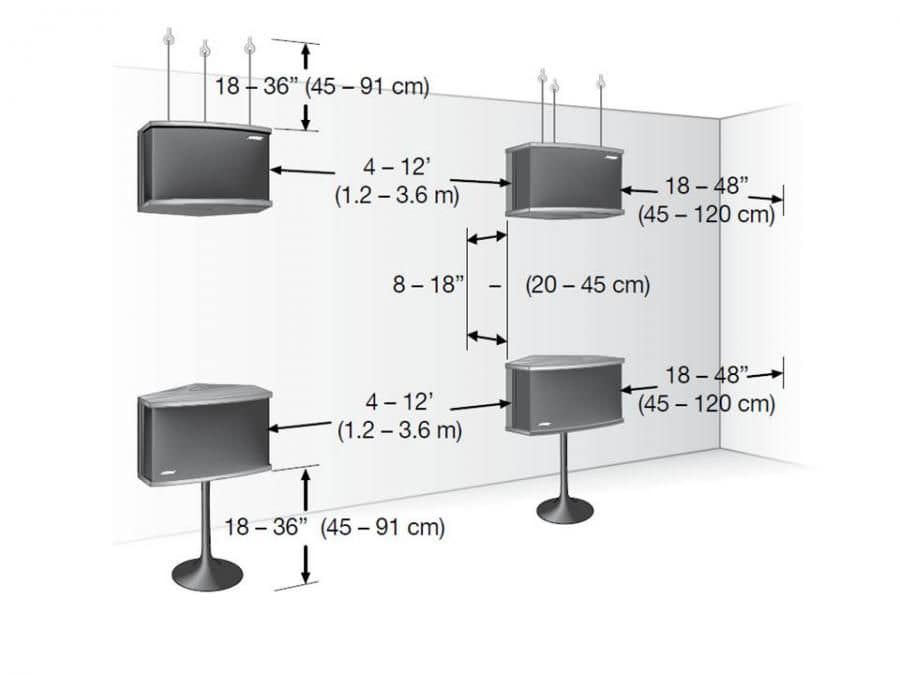
Speaker location is covered in depth by Bose in their highly detailed setup guides, which are readily available on the FB Bose 901 group files section.
2) Selecting a power amp with enough power and a fairly high damping factor (over 40) is key. Note that those two requirements preclude most tube amps.
Amp selection and “the wattage numbers” is discussed on my page on amplifier power, here: What’s all this watts, eh?
( If that page is tl’dr, a vintage amp in the 60-100 watt range is a good starting point; more is usually better. )
3) Setting up the Bose Active Equalizer has been complicated by evolution in baseline audio technology. As audio moved to multi-channel, it occasioned the removal of the old standard “two-channel” processing loops, precluding use of the tape in/outs with the active equalizer as mentioned by Bose.
Towards this latter point, this article will explore the original schema and also more current methods to set up the active equalizer for use with today’s audio equipment.
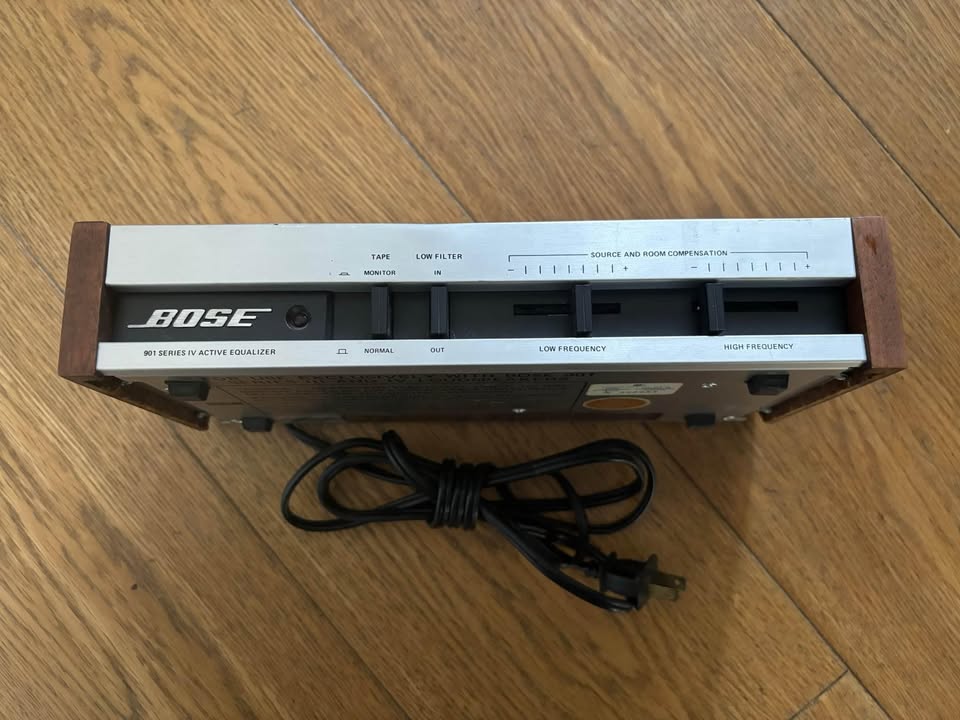
About the Active Equalizer
So why is this EQ box thingy important?
In the case of the 901’s, the usual loudspeaker crossover and tuning circuitry is not in the typical place in the speaker box, where it operates on the speaker level signal.
Instead, the 901 tuning circuitry is in a separate box that is designed to operate on consumer audio line level signals.
OK, that’s cool and all, but what does this EQ actually box do? Simply, it provides a specialized speaker equalization curve to smooth out the 901’s frequency response and also “voices” or fine tunes the overall sound.
(Although electronically this is an “equalizer”, it is not the same as the standard graphic equalizer “GEQ” most audio folk are familiar with. The Bose Active Equalizer has been carefully tailored to the Bose 901 speaker system, and the eq curve it provides is not readily reproducible with a GEQ.)
See Bose 901 EQ – Series II, IV for more info on the equalizers.
To do it’s job, the signal must “flow through” the Active Equalizer box’s circuitry, like this:

(Please excuse the crude drawing. It’s late and I’m tired.)
Looking at this, you can see the “tape in” could be used as a second line level input; there’s nothing special about it. Also notice the labeling is a bit confusing as to the signal flow, and changes a bit from series to series.
Also see “Testing a system for Bose EQ compatibility” below1 for more info on how to verify that your tape connection is really a compatible “tape loop”.
Next, here’s a conceptual diagram of a typical vintage receiver.
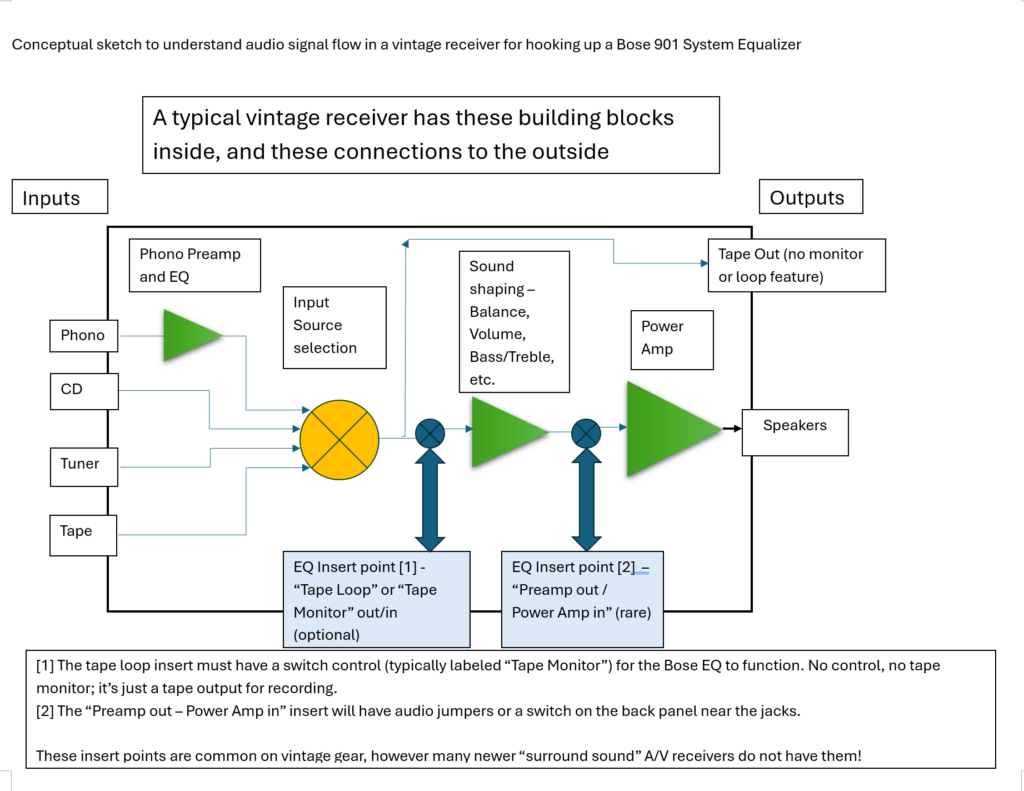
With all that understood, and moving right along…
Here are five (count ’em, 5) methods to hook up a 901 Active Equalizer to your system. (There are probably other variants, but I believe they will derive from one of these.)
Method 1 – “insert” the Bose EQ into a tape or processing loop, before the volume control.
Method 2 – “insert” the Bose EQ between the preamp and power amp, after the volume control.
Method 3 – feed the Bose EQ from your A/V receiver’s alternate (eg “Zone 2”) analog outputs, using an external amplifier.
Method 4 – feed the Bose EQ from the receivers headphone jack, using an external amplifier.
Method 5 – feed the Bose EQ from the amplifiers speaker connections using a “line converter” to isolate and convert the speaker signal into a consumer level signal, and then into an external amplifier.
There is also a virtually unlimited number of ways to hook the Active EQ up incorrectly, like between the power amp and the speakers. (Ouch, especially don’t do this one!)
Observe “not working” is considered a less desirable hookup method, and will not be discussed further. 🙂
OK, let’s look at these hookup methods more closely.
Method 1 – “insert” the Bose EQ into a tape or processing loop, before the volume control.

(This image is copied from the Bose Version IV Users guide.)
This is the original recommended hookup method, and still a good one… if it’s still possible to use. Unfortunately, the tape monitor and processor features have generally been dropped from current multi-channel A/V receivers. Nowadays a tape control is often just another input (no monitoring or insert feature available) so the Bose EQ can’t be inserted into the signal chain.
See “Testing a system for Bose EQ compatibility” below1 for more info on how to verify if your tape connection is compatible.
Comments
– Remember to bypass the Active EQ if you have a second speaker system hooked up as your “B” speakers. The Bose EQ is tailored for the 901’s, and the high levels of boost at the frequency extremes can easily damage conventional speakers tweeters and woofers.
Method 2 – “insert” the Bose EQ between the preamp and power amp, after the volume control.
You can use this method if:
– you have preamp out jacks and an external amplifier, either a receiver or separates.
OR
– you have jumper’d preamp-out/amp-in jacks on the back of your receiver or integrated amp.
The preamps output goes to the Bose EQ input and the Bose EQ output goes to the amp input. You can either use the internal amp as shown below or a more powerful external one.

(This image is copied from the Bose Version IV Users guide.)
(OR)

(This image is copied from the Bose Version IV Users guide.)
Comments:
-Method 2 is my preferred method. You don’t have to remember to operate a separate switch for the 901’s Active Equalizer, and it makes a multiple amp/speaker setup simple to hookup and maintain.
Method 3 – feed the Bose EQ from your A/V receiver’s alternate (eg “Zone 2”) analog outputs, using an external amplifier.
Many current A/V receivers have an alternate set of outputs for multi-room use as a second zone of audio. Look for RCA/cinch jacks labeled like this:

Comments:
-This second zone feature can be readily used as a standard preamp out as described in “Method 2”.
-You will need a separate (second) power amp
-Some receivers have a remote volume for the second zone, some do not. Best to plan on your external amp having a volume control for this application.
-This method assumes you still are using your standard home theater speakers for surround sound and you want to use the 901’s for stereo use.
Method 4 – feed the Bose EQ from the receivers headphone jack, using an external amplifier.
Most A/V receivers have a headphone jack, and this is actually a pretty good way to connect the Bose EQ and speakers via an extra power amp to your setup.
-The headphone jack usually disables your main speakers, so it’s a convenient way to listen to the 901’s by themselves. Plus, you can hear the headphone surround processing on your Bose 901s, which can sound really interesting with some material.
-Headphone jacks are usually low noise by design, otherwise you would hear noise in your headphones. That means it’s a quiet output to use with your amp too!
Comments:
Caution! Make sure the Bose EQ and amp are powered off when plugging in or unplugging the headphone jack! If you forget, the blast of noise and possible hearing damage will remind you!
-You will need a separate (second) power amp.
-On occasion, you may have noise or ground loop issues. Use of a ground isolator will take care of it.
Method 5 – feed the Bose EQ from the amplifiers speaker connections using a “line converter” to isolate and convert the speaker signal into a consumer level signal, and then into an external amplifier.
This is the only solution for folks with A/V receivers that don’t have any of the prior connections on their sound systems.
The idea is to safely connect to the amps speaker outputs, isolate and change the signal into the standard consumer line level that the Bose EQ can operate at, and then feed a separate power amp. This hat trick is accomplished by a cool little box called a “line converter”, which is a readily available solution in the car audio area.
This method isn’t mentioned by Bose because it wasn’t an issue at the time; tape loops were still a standard feature. But as home tape decks became less common the feature gradually went the way of phono pre-amps, rumble filters, and mono buttons; rarities all now.
There are some requirements for an appropriate line converter for this application:
First, the line converter must provide a safe load for the amplifier. No amp smoke please.
Second, it must electrically isolate the speaker connections from each other and the next device via an isolation transformer. Again, no smoke please.
Third, it must reduce or “pad” down the speaker signal level to the standard consumer line level. Overdriving electronics in a hi-fi system sounds really, really bad.
Optionally, a level control will allow easier system level matching or if the power amp doesn’t have level controls.
Lastly, (and this shouldn’t need to be said, but…) a line converter should do it’s job without adding significant amounts of distortion or frequency aberrations.
Here’s a diagram from der webz that illustrates how a properly made one of these gadgets works.

Note this gadget has near universal compatibility. It will let you keep using whatever amp or receiver you already have, a particular bonus if your existing equipment is part of a complex A/V system.
Caution: Not all line converters isolate from the amplifiers correctly!
(For you techies, the issue is many receivers (especially the Class D ones) have bridged amp outputs. These must be loaded properly and they expect isolated grounds. The transformer isolation is important!
I shopped around to find this one, which I then tested it to verify it will work correctly. I also opened up to look at the build quality, which is acceptable.
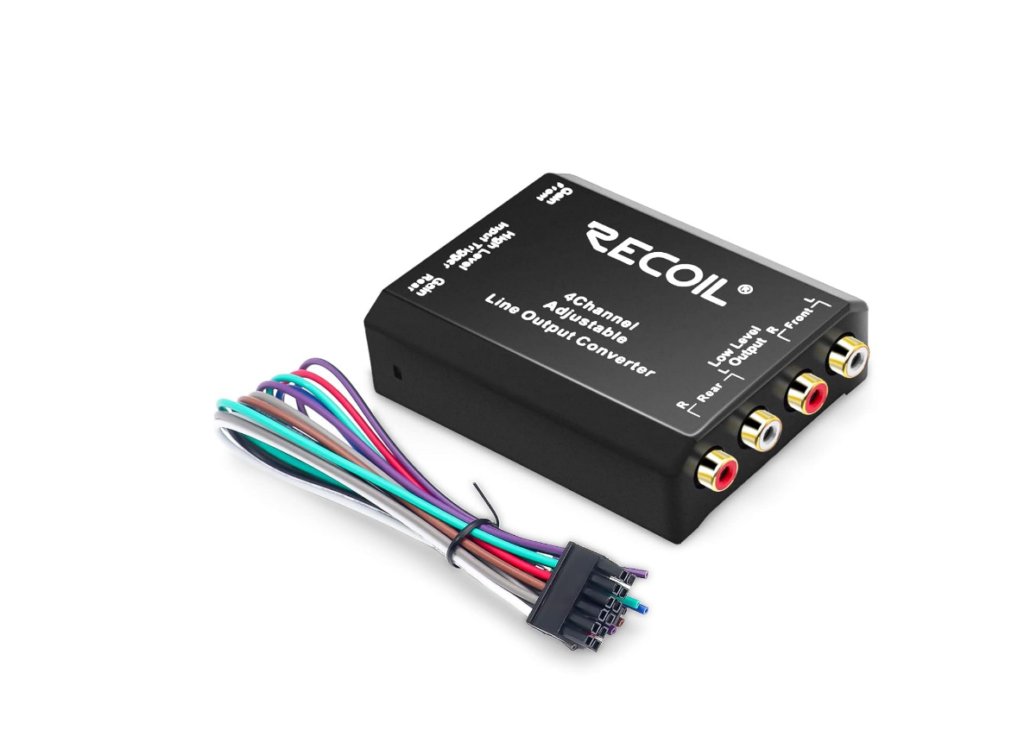
“Recoil LOC4 Four Channel Speaker Cable to RCA Adjustable Line Output Converter”
It fits the requirements listed previously and bonus! it has four channels and a simple 12V trigger turn-on system for the power amps. And it is reasonably priced ($19 USD on Amazon), which doesn’t hurt either. Frequency is pretty flat out to 30 kHz, THD is less than .1% over most of the audio band.
(add second source unit here)
Comments:
-You will need a separate (second) power amp
-The conversion adds a minuscule amount of distortion. Whether it is audibly objectionable is highly dependent on your ears and system.
-Your first power amp stage may produce an objectionable amount of noise or hiss after being amplified by the second amplifier. This last point usually doesn’t matter much in a car (where road and wind noise will likely mask it) but a quiet living room is another matter. But try it and see, most amps these days tend to be very quiet.
Testing a system for Bose EQ compatibility
In the “ye good olde days” a tape monitor or tape loop was a common feature on stereo receivers and integrated amplifiers. The concept was if you have a three head tape deck, you could record your music on the tape deck via the record head, and then “monitor” what you just recorded by immediately playing it back thru the playback head. This trick was accomplished via the “tape monitor” feature. What this feature really did was to allow you to insert a device into the signal flow, like a tape deck, or a graphic equalizer, or, ahem, a Bose Active Equalizer.
Some receivers or integrated amps also had a processor insert, which is much the same thing as the tape monitor feature but labeled for an equalizer or other signal processor. Either of these are ideal candidates to use with the Bose Active Equalizer.
However, current A/V surround receivers typically do not have the “tape monitor” feature that was commonplace when the 901’s and the EQ were produced. And even more confusingly, A/V receivers may have jacks marked “Tape In” and “Tape Out”, but unless there is also a tape monitor switch they will not work for the Bose system EQ.
So, how do you tell whether your systems tape jacks will work or not then? With a test, of course! Here is a step by step method to test your system to see if it has a real tape monitor feature.
You will need:
-A stereo RCA cable.
-Access to your receiver/stereo/integrated amp back panel connections.
-A music source
Test process
- Locate your tape monitor or processor jacks and the control that selects them.
- Turn the system volume down. (This is important, as it is possible to get an earsplitting feedback loop with this test with an incompatible or miswired system.)
- Using the RCA cable, connect the left “tape in” jack to the left “tape out” jack. In many cables, this will be the “white” connection.
- Next, connect the right “tape in” jack to the right “tape out” jack. In many cables, this will be the “red” connection.
- If you have an A/V receiver, turn off the surround modes by setting to stereo or “pure” mode. This should ensure all surround processing and speakers are all off.
- Power on your Receiver and the Bose Active Equalizer
- Carefully and slowly turn up the volume to a moderate setting while playing music from any convenient source. It should sound normal. with just the two front speakers operating. If music sounds odd (garbled, distorted, or has a change in volume), disconnect the cable. If the sound goes back to normal after disconnection, then go to step “DARN!” below.
- If step 7 was a pass, now engage the tape monitor or processor control. There should be no changes in the sound, i.e. both channels work, not garbled, no change in level. If the sound changes at all, go to step “DARN!” below.
- If step 8 was a pass, now carefully unplug one end of the left plug on the test RCA jumper cable. The left channel and only the left channel should go silent with the tape monitor switch engaged, and the left channel sound should return and be close to the same volume as the right channel when you disengage the monitor switch. Toggle several time to be sure. If that condition is not met, carefully check your connections and retry, otherwise go to to step “DARN!” below.
OK! – If steps 6, 7, and 8 were successfully completed:
Congratulations! your receiver will work with the Bose Active Equalizer.
Refer to the above hookup guide: “Method 1” to connect your Bose 901 EQ properly.
“DARN!” – Your tape jacks are not compatible with Bose EQ use.
Remove the test cable and look at the other connection methods above for the best fit for your situation.
<end>
Art and Technology
Author doc notes:
- For Method 5:
-Find a few alternate line converters
-Discuss using the line converter to add a subwoofer, discuss compromise of not using a high pass
-Add some tips on level management
Direct Page jump to EQ test section (uses an html anchor):
https://farmedia.com/bose-active-eq-hookup-guide/#BoseEQCompat